Showing posts with label Easter. Show all posts

Monday, April 18, 2011

Cracking Easter Cards


I wanted to make some Easter cards with the boys to attach to Easter Eggs that Master 4 will give to his teachers at kinder on Thursday. I use to love receiving homemade cards from the children that I taught, they were always made with such love. I cut out some egg and bunny templates from white card and the boys had a wonderful time making bubble prints on them.


Bubble prints are like fingerprints, except made with bubbles. You can make bubble prints and learn about how bubbles are shaped and how pigments combine to make different colours.

Bubble prints are made by colouring bubble solution, blowing bubbles, and pressing paper onto the bubbles. You need brightly-colored bubbles in order to get a good picture. Tempera paint powder works really well, but you can substitute other water-soluble paints if you like.


Make Coloured Bubble Solution Pour a little bubble solution onto the bottom of a cup. Stir in paint powder until you have a thick paint. You want the thickest paint you can get, yet still be able to make bubbles using it. If you get the three primary colours of tempera paint then you can mix them in order to make other colours. You can add black or white paint, too.

Wednesday, March 23, 2011

Easter Bonnet Parade


An Easter Bonnet represents the tail-end of a tradition of wearing new clothes at Easter. So I'm all for any excuse to make a new hat to wear. Beautiful bonnets are a must at every Easter parade, those made with such love and worn with such pride as the little legs often carry the heavy load on top. This year is Master 4's first Easter Hat parade at Kinder and I have to admit he is very excited, and so is his mum! Together we had great fun chatting about what colours we should use and what the colours of Easter represent. While we worked on the hat together it gave me an opportunity to talk to Master 4 about the meaning behind the Easter Celebration and why we use certain symbols to represent this time. (Egg/Chickens represent New Life) He is becoming increasingly interested in the stories we read from his Children's Bible and enjoys the opportunity to ask me questions. We really had great fun spending the afternoon creating his masterpiece which I know will be worn with such pride as he walks with his classmates tomorrow morning.


Prior to going to the discount store to buy bits and pieces to make the Easter hat, I had chatted to Master 4 about the colours that represent Easter within our church. He then decided that he would like to make a purple and yellow hat. We had so much fun looking for everything for his hat.


We bought some cheap polystyrene eggs that Master 4 enjoyed painting in purple and yellow and then rolled in glitter. When you paint polystyrene I always find it easier to put a kebab stick into it to hold while you paint. Put the sticks into an apple while they dry evenly.


Here is the master piece! I love the way we were able to bring patterning into the activity as Master 4 decided he wanted to patterned the feathers around the edge of the hat. (purple/yellow/purple/yellow etc)
While we were waiting we had a go at baking these super cute Easter Bonnet Biscuits from a recipe I found.
Ingredients
1 cup butter, softened
1 cup sugar
2 eggs
2 tsp. vanilla extract
3 cups all-purpose flour
1/2 tsp. salt
1 tbsp. baking powder
Decorations, such as frosting, tubes of decorating gel, sprinkles, fruit leather


Instructions
In a large bowl, beat together the butter and sugar until fluffy.
Beat in the eggs and vanilla extract, then stir in the dry ingredients and combine well.
Divide the dough and roll it into 2 logs, one about 10 inches long and 2 inches in diameter, and one about 10 inches by 1 inch.Wrap them in plastic and refrigerate until firm, at least 3 hours.
Heat your oven to 400 degrees.
Cut the logs into 1/4-inch slices and bake on greased cookie sheets for 8 to 10 minutes for the large slices and 5 to 7 minutes for the small.
Cool on wire racks.
Stack the small cookies on top of the large ones, gluing them in place with a dab of frosting.
Frost the bonnets, then decorate them with gel icing, sprinkles, and fruit leather ribbons.


Saturday, February 26, 2011

The Best Nest

The boys each a bag and we headed outside on a bush walk to observe birds and to collect materials for their bird's nests. The boys collected, grass, soft paper, string, leaves, yarn, leaves, and thin twigs.


This activity provided such a wonderful opportunity for language development. The boys talked lots about why they chose certain materials e.g "This big piece of bark I'm putting in will protect the eggs from the wind and rain." "I chose these twigs because they look like the tree that a nest could be in, that way a vulture will think it is a normal tree, it's hibernating."


Rolling eggs with play dough is great for fine-motor skill development.


Making a Bird Nest


Materials Needed:


  • Brown Play dough, Clay or shredded string

  • Outdoor materials- collected by your child on your walk

  • Toothpick (to write their name and date underneath) if you use clay

  • bags

  • Play dough

Preschoolers are natural scientists. This morning I decided we would have a day learning about bird, nests and habitats. I gave the boys each a bag and we headed outside on a bush walk to observe birds and to collect materials for their bird's nests. The boys collected, grass, soft paper, string, leaves, yarn, leaves, and thin twigs.


Once back home I gave the boys some brown shredded paper string I had picked up from the discount store in the craft section (you could also use play dough or clay prepared the night before) The brown shredded string will represent the mud for this craft. I showed the boys how to shape the string into a bowl-like configuration. Next, they used their fists to push the center of the "nest" in, and gently pull the sides up. With a preschool craft, it is always best if each work of art is different so I went with the shape that they made for their nest! Then I had the boys use the outdoor materials they collected to stick into the string. Then the boys used some play dough to roll some eggs to put inside their nest. This was a wonderful activity rich in language development as well as science. The boys are so proud of their nests and will definitely take pride of place on our Easter shelf!


Thursday, February 24, 2011

Crushed Egg Shell Art


I remember finding this book last year and just loved sharing it with the children I taught, and now with my own boys. For me, the real appeal of a Jan Brett book is her detailed illustrations. She draws the bunnies realistically, adding warm smiles on their faces. I always enjoy Jan Brett's books, especially her holiday stories. This story is perfect for little one's between 3-6 as it sends a good message - kindness. I love that she puts extra information in the small side pictures or in the scenes at the top of the pages, giving children a chance to see some action going on in the background or giving a preview of what's to come next. It's always fun to see how and where she has inserted her favourite animal (the hedgehog) into each of her books. The brilliant colours make her illustrations almost jump off the page - a nice contrast to her usual gentle story lines. I fell in love with this sweet bunny the first time I read through the book, as did my boys, and I'm sure you will too!


What you need:


12 coloured eggs
PVA glue
card stock
pencil

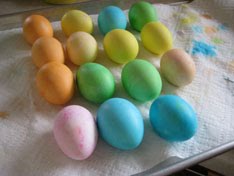
  • Colour dye a dozen eggs, even leaving a few white.


  • Let the eggs dry and then peel the shell. Make sure the shell is dry before you put it all into a zip lock bag and crush.


  • Draw an image on a piece of card using PVA Glue.


  • Sprinkle the crushed egg shell on the glue to create an egg-tastic picture.